

My craft room/sewing studio that I’ve been working on for months is almost done. I have corralled my artsy-crafty-sewing junk from all over the house into one place and let me tell you, it’s heaven! Despite my general messiness, I enjoy things being organized and having their proper place. I may not put them away promptly, but at least they have a good spot once I do!
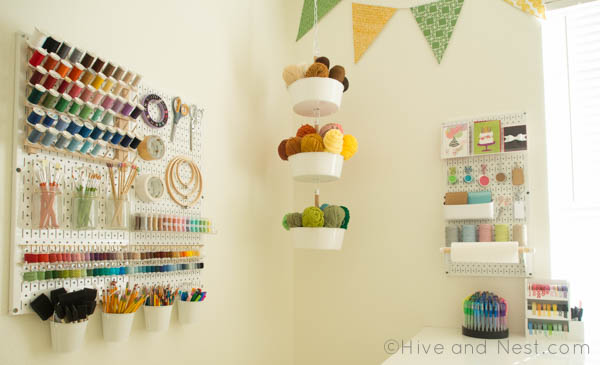
Although I love everything about this room, I get a special thrill every time I look at my nicely organized pegboards. Only they’re not pegboards; at least not the old-fashioned kind of pegboard. That stuff is made out of flimsy particle board; the quality is a little lacking. I remember that pegboard from the garage of my youth. My dad had some and it seemed a little chintzy and the hooks always fell off when I’d grab a tool. In my craft room I was hoping to find something a little more substantial and polished-looking. I settled on a great alternative; these are metal panels from Wall Control that come in several different colors. They’re 16″ wide and in my house that meant that I could screw them directly into the studs (always a good thing. I love to find a stud. Hardy har.)
Wall Control makes several different styles of hooks and clips and they all fit into the wall panel slots snugly so there’s no wobbling or falling out accidentally. I used them to hang up and organize lots of my craft, sewing and art supplies like my bobbin holder, duct tape (gold, because I’m fancy like that), embroidery hoops, and several dollar-store metal buckets that hold my foam paintbrushes, Sharpies and lots of pencils.

My biggest mess has always been my thread; especially my embroidery thread. It’s always a tangle and it’s a pain to find the right color. But now I’ve got it organized and I’m madly in love with how it looks. My sewing machine thread is up top on a wooden thread rack that you can find at Amazon or your local fabric store (it either hangs up or props up on the table with some fold-away legs.) I hung mine on two Wall Control 2″ hooks
. Although my thread is not right next to my machine, I actually prefer it hanging up this way. I hate trying to sew with stuff all over the table. Everything gets in a jumble and I end up totally frustrated. I want a clean slate with everything off my sewing surface but the fabric and the sewing machine.
I wanted my embroidery thread to be easy to see and find. But I didn’t want to have to shuffle it around. I wanted to be able to take off just the thread I wanted, without messing up all the others. Which meant I needed a bar and hangers of some sort. Here’s the system that I came up with that works marvelously:

I used these little hooks (two on each side and one in the middle) to hold up a very thin brass rod. The rod from Lowe’s is 36″ long, which was a bit too long, so I used a little hand saw to cut off a few inches (Here’s a weird side note. I found these rods on the Lowe’s website so I ordered them and they were in-store so I picked them up a couple of hours later. I thought about getting one more but nobody in the store could find them anywhere. I asked several people and nobody had a clue! Moral of the story: pay for them online and they will magically appear at the Customer Service counter.) Then I polished up the brass bars so they shone. (Have you ever used Simichrome Polish
? My gosh, it will polish every kind of metal like you wouldn’t believe. Love it!). I ended up having so much thread that I had to use two rods for all of it.
Next I wound up the thread on little plastic cards that you can get in the embroidery section of any craft store. They’re super cheap (25 for $1). I labelled each one and attached them to brass clips that I bought on Amazon (these come in a big package but even so they’re still cheaper than at the craft store if you need a bajillion of them like I did). And then the thread had to be rainbow-ized which is one of my favorite things to do.
I use lots of glitter when I do nails so I like to keep all the jars handy on a removable shelf so I can take them to my nail polishing table. Again, I used a couple of little Wall Control hooks to support a clear acrylic shelf from Amazon. Sadly, this shelf was discontinued, but this set of three shelves looks pretty similar.

I picked up three frosted jars with brass hanging wires from Hobby Lobby (in the glass jar and bottle section) to hold my paint brushes and knitting needles. Don’t you love these polka-dotted bamboo needles? They’re just plain old Clover knitting needles that they have at any craft store, but I painted them to make them look cuter and to tell apart the different sizes. Plus I like to add polka dots to my life whenever possible.

I ended up getting a third Wall Control panel to keep closer to my work area. This one I use to organize my greeting cards and gift tags. There’s also a nifty shelf to hold my assortment of baker’s twine. I used another clear acrylic shelf to hold greeting cards, and a magnetic bin to hold smaller note cards.

But best of all is the paper towel holder. How many times have I needed a paper towel in the middle of a project? Pretty much always since I tend to be a little messy. So I was super jazzed to see that Wall Control offers a paper towel holder just for their panels. Now I have them right at hand and it stays put without wobbling around or falling off like most paper towel holders. This would also work well as a ribbon holder, I imagine.

So there you have my well-organized craft walls. I’m loving how orderly and easy-to-grab everything is. And how fantastic it all looks. It makes my heart sing! Come back later this week for a full tour of the rest of my craft room. I think you’ll love it!
I paid for all products mentioned in this post myself. I do get a few pennies if you buy things through my Amazon links, though. Which you most definitely should do because I would never recommend anything that I don’t love.
I love that you are honest about getting money from amazon. Not many are that honest. So thumbs up for you!
(it also makes me want to use the links should I plan to buy, something I normally don’t because I can’t stand the dishonesty that most show but hiding that fact)
And great blog post 🙂 A+ on all aspects 😀
Another thing I rarely do is comment, but your honesty made me wanna tell you that I loved the post 🙂
Thank you, Ulrika! I hate when people aren’t totally upfront either. Might as well just say it like it is!
I am always thought about this, thank you for putting up.